

In my earlier post, I referred to the post by Ben Foster on using ASP.Net Identity libraries to add authentication support.
I'm planning to try the same using an ASP.Net MVC 5 web application.
I'll be covering the same on my blog as a 3 part series, this being the first part.
The aim is to add cookie-based authentication along the lines of ASP.Net forms-based authentication.
We'll achieve this using the ASP.Net Identity libraries.
With this background, let's begin...
Create an empty ASP.Net MVC 5 project.
Go to
File -> New -> Projectin Visual Studio. (Note: I'm using Visual Studio 2015)Select the
ASP.Net Web ApplicationprojectOn the ASP.Net template dialog select the
Emptytemplate.In the
add folders and core referencessection select theMVCoption.
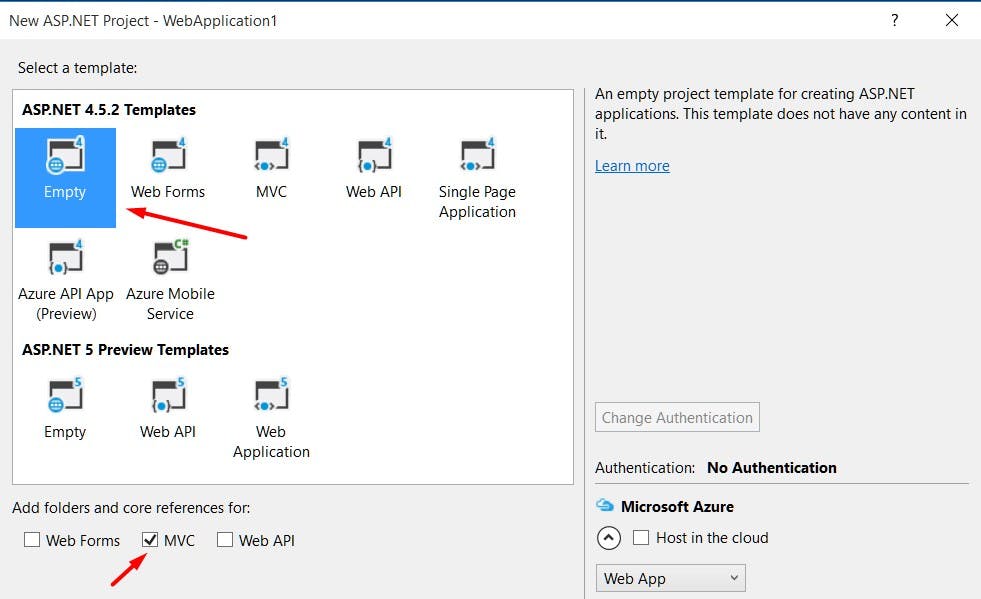
This will create the basic ASP.Net MVC 5 web project.
To perform cookie-based authentication we need to install the following 2 Nuget packages
Microsoft.Owin.Host.SystemWeb
This package enables the OWIN middleware to hook into the IIS request pipeline.
Install this using
Install-Package Microsoft.Owin.Host.SystemWeb
Microsoft.Owin.Security.Cookies
This package enables cookie-based authentication.
Install this using
Install-Package Microsoft.Owin.Security.Cookies
It's now time to initialize the OWIN identity components.
Add a
Startup.csclass to the project.Add the
Configurationmethod which accepts theIAppBuilderinstance as a parameter as follows...
using Microsoft.Owin;
using Microsoft.Owin.Security.Cookies;
using Owin;

namespace ASPNetMVC5Identity
{
    public class Startup
    {
        public void Configuration(IAppBuilder app)
        {

        }
    }
}
Add another class file
Startup.Auth.csunderApp_Startfolder.Create a partial class
Startupin this file.To add cookie-based authentication we can now add...
using Microsoft.Owin;
using Microsoft.Owin.Security.Cookies;
using Owin;

namespace ASPNetMVC5Identity
{
    public partial class Startup
    {
        public void ConfigureAuth(IAppBuilder app)
        {
            app.UseCookieAuthentication(new CookieAuthenticationOptions
            {
                AuthenticationType = "ApplicationCookie",
                LoginPath = new PathString("/auth/login")
            });
        }
    }
}
Here the
UseCookieAuthenticationextension tells the ASP.Net Identity framework to use cookie-based authentication.AuthenticationType
This is a string value that identifies the cookie.
Note: If we installMicrosoft.AspNet.IdentityNuget package we can use the constantDefaultAuthenticationTypes.ApplicationCookiewhich has the same value asApplicationCookie.LoginPath
This is set to the path to which the browser should be redirected when your application returns an unauthorized response (HTTP 401).
In our case, we have anAuthControllerwith aLoginaction.
In the
Startupclass in the root folder place a call to theConfigureAuthmethod as follows...
namespace ASPNetMVC5Identity
{
    //To initialize the OWIN identity components we need to add a Startup class to the project.
    //This class should have a method Configuration that takes an OWIN IAppBuilder instance as a parameter.
    public partial class Startup
    {
        //This class will be automatically located and initialized by the OWIN host
        public void Configuration(IAppBuilder app)
        {
            ConfigureAuth(app);
        }
    }
}
Before we add the authentication logic let us first create a basic resource to which we plan to have authorized access.
Let's add the following controller
public class HomeController : Controller
{
    // GET: Home
    public ActionResult Index()
    {
        return View();
    }
}
- and the corresponding view as...
@{
    ViewBag.Title = "Index";
}

<h2>This my HomeControllers Index view page!!</h2>
<h4>You need to be logged in to view this page.</h4>
- The
RouteConfigclass in RouteConfig.cs file underApp_Startfolder has the following default route...
public class RouteConfig
{
    public static void RegisterRoutes(RouteCollection routes)
    {
        routes.IgnoreRoute("{resource}.axd/{*pathInfo}");

        routes.MapRoute(
            name: "Default",
            url: "{controller}/{action}/{id}",
            defaults: new { controller = "Home", action = "Index", id = UrlParameter.Optional }
        );
    }
}
- Hence if we now run the web application it will display this HomeController's index page as follows...

We'll now create the
AuthController.This will have the
Loginaction to which the user would be re-directed when they need to log in.
public class AuthController : Controller
{
    // GET: Auth
    public ActionResult Login()
    {
        return View();
    }
}
- and the corresponding view as...
@{
    ViewBag.Title = "Log In";
}

<h2>Log In</h2>
- Now let's decorate the
HomeControllerwith the[Authorize]attribute as we want only authorized users to be able to access it.
[Authorize]
public class HomeController : Controller
{
    // GET: Home
    public ActionResult Index()
    {
        return View();
    }
}
Now run the application. You'll observe that when the Default route is requested which is
http://localhost:51910/instead of opening up theIndexview of theHomeControllergets redirected toLoginaction of theAuthController.The redirected URL now shows up as...
http://localhost:51910/auth/login?ReturnUrl=%2FAlso, the
Loginview of theAuthControllershows up in the browser.
Next we'll cover the actual log in logic in Part 2 of this series.